RocketMQ-消息发送
由于消息发送还涉及到延迟发送,顺序发送,批量发送等情况,分享下自己看源码总结的一般同步发送消息逻辑。
Producer启动
跟进producer.start()实质调用了DefaultMQProducerImpl的start(),startFactory==true
1 | public void start(final boolean startFactory) throws MQClientException { |
clientId=客户端ip+@+实例名+unitName(可选),对于同一个JVM中的不同消费者和不同生产者在启动时候获取到的MQClientInstance是同一个。MQClientInstance是封装了网络调用相关的逻辑
mQClientFactory.start():1
2
3
4
5
6
7
8
9
10
11
12
13
14
15
16
17
18
19
20
21
22
23
24
25
26
27
28
29
30
31
32
33
34public void start() throws MQClientException {
// 同步当前实例
synchronized (this) {
switch (this.serviceState) {
case CREATE_JUST:
this.serviceState = ServiceState.START_FAILED;
// If not specified,looking address from name server
if (null == this.clientConfig.getNamesrvAddr()) {
this.mQClientAPIImpl.fetchNameServerAddr();
}
// 启动Netty客户端
this.mQClientAPIImpl.start();
// 开启定时任务
this.startScheduledTask();
//启动消息拉取线程
this.pullMessageService.start();
// 启动消息重负载线程
this.rebalanceService.start();
// Start push service
this.defaultMQProducer.getDefaultMQProducerImpl().start(false);
log.info("the client factory [{}] start OK", this.clientId);
this.serviceState = ServiceState.RUNNING;
break;
case RUNNING:
break;
case SHUTDOWN_ALREADY:
break;
case START_FAILED:
throw new MQClientException("The Factory object[" + this.getClientId() + "] has been created before, and failed.", null);
default:
break;
}
}
}
进入NettyRomoteClient的start(): 看到了熟悉的Netty的Bootstrap和pipeline了。pipeline中加入了编解码器 心跳检测 连接管理以及客户端handler处理1
2
3
4
5
6
7
8
9
10
11
12
13
14
15
16
17
18
19
20
21
22
23
24
25
26
27
28
29
30
31
32
33
34
35
36
37
38
39
40
41
42
43
44
45
46
47
48
49
50
51
52
53
54
55
56public void start() {
this.defaultEventExecutorGroup = new DefaultEventExecutorGroup(
nettyClientConfig.getClientWorkerThreads(),
new ThreadFactory() {
private AtomicInteger threadIndex = new AtomicInteger(0);
@Override
public Thread newThread(Runnable r) {
return new Thread(r, "NettyClientWorkerThread_" + this.threadIndex.incrementAndGet());
}
});
Bootstrap handler = this.bootstrap.group(this.eventLoopGroupWorker).channel(NioSocketChannel.class)
.option(ChannelOption.TCP_NODELAY, true)
.option(ChannelOption.SO_KEEPALIVE, false)
.option(ChannelOption.CONNECT_TIMEOUT_MILLIS, nettyClientConfig.getConnectTimeoutMillis())
.option(ChannelOption.SO_SNDBUF, nettyClientConfig.getClientSocketSndBufSize())
.option(ChannelOption.SO_RCVBUF, nettyClientConfig.getClientSocketRcvBufSize())
.handler(new ChannelInitializer<SocketChannel>() {
@Override
public void initChannel(SocketChannel ch) throws Exception {
ChannelPipeline pipeline = ch.pipeline();
if (nettyClientConfig.isUseTLS()) {
if (null != sslContext) {
pipeline.addFirst(defaultEventExecutorGroup, "sslHandler", sslContext.newHandler(ch.alloc()));
log.info("Prepend SSL handler");
} else {
log.warn("Connections are insecure as SSLContext is null!");
}
}
pipeline.addLast(
defaultEventExecutorGroup,
new NettyEncoder(),
new NettyDecoder(),
new IdleStateHandler(0, 0, nettyClientConfig.getClientChannelMaxIdleTimeSeconds()),
new NettyConnectManageHandler(),
new NettyClientHandler());
}
});
this.timer.scheduleAtFixedRate(new TimerTask() {
@Override
public void run() {
try {
NettyRemotingClient.this.scanResponseTable();
} catch (Throwable e) {
log.error("scanResponseTable exception", e);
}
}
}, 1000 * 3, 1000);
if (this.channelEventListener != null) {
this.nettyEventExecutor.start();
}
}
到此,消息发送的必要条件:生产者启动过程就结束了,我们接着看一下消息发送的流程
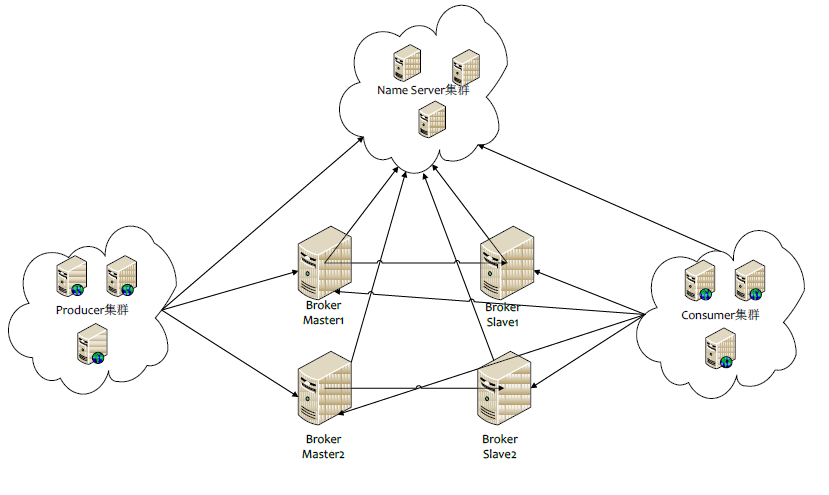
总结:NameServer提供轻量级的服务发现和路由,Producer和Consumer相当于Netty Client,而最重要的Broker充当Netty Server角色 通过提供轻量级的 Topic 和 Queue 机制来处理消息存储,同时支持推(push)和拉(pull)模式以及主从结构的容错机制。
同步发送消息
从SendResult result = producer.send(msg)入手。消息对应的Topic信息以及具体内容被封装在了Message中,并交由DefaultMQProducer,调用send()进行发送。DefaultMQProducer 只是一个面向调用方的代理,真正的生产者是DefaultMQProducerImpl,具体实现见sendDefaultImpl方法
寻找Topic对应的路由信息
1 | TopicPublishInfo topicPublishInfo = this.tryToFindTopicPublishInfo(msg.getTopic()); |
- 先从本地缓存的路由表中查询;
- 没有找到的话,便向NameSrv发起请求,更新本地路由表,再次查询。
- 如果仍然没有查询到,表明Topic没有事先配置,则用Topic TBW102向NameSrv发起查询,返回TBW102的路由信息,暂时作为Topic的路由。
选择消息要发送到的队列
根据topic路由表及broker名称,获取一个messageQueue,本次发送的队列就是选取的队列1
2
3
4
5
6
7
8
9
10
11
12
13
14
15
16
17
18
19
20
21
22
23
24
25
26
27
28
29
30
31
32
33
34
35
36
37
38
39
40
41
42
43
44
45
46MessageQueue mqSelected = this.selectOneMessageQueue(topicPublishInfo, lastBrokerName);
public MessageQueue selectOneMessageQueue(final TopicPublishInfo tpInfo, final String lastBrokerName) {
// 如果启用了broker故障延迟机制
if (this.sendLatencyFaultEnable) {
try {
// 本次需要发送的队列的index就是SendWhichQueue自增得到的
int index = tpInfo.getSendWhichQueue().getAndIncrement();
for (int i = 0; i < tpInfo.getMessageQueueList().size(); i++) {
// index与当前路由表中的对列总个数取模
int pos = Math.abs(index++) % tpInfo.getMessageQueueList().size();
if (pos < 0)
pos = 0;
// 获取到当前对应的待发送队列
MessageQueue mq = tpInfo.getMessageQueueList().get(pos);
if (latencyFaultTolerance.isAvailable(mq.getBrokerName())) {
if (null == lastBrokerName || mq.getBrokerName().equals(lastBrokerName))
return mq;
}
}
// 至少选择一个broker
final String notBestBroker = latencyFaultTolerance.pickOneAtLeast();
// 获取broker中的可写队列数
int writeQueueNums = tpInfo.getQueueIdByBroker(notBestBroker);
// 如果可写队列数>0,则选取一个队列
if (writeQueueNums > 0) {
final MessageQueue mq = tpInfo.selectOneMessageQueue();
if (notBestBroker != null) {
mq.setBrokerName(notBestBroker);
mq.setQueueId(tpInfo.getSendWhichQueue().getAndIncrement() % writeQueueNums);
}
return mq;
} else {
// 可写队列数 <= 0 移除该broker
latencyFaultTolerance.remove(notBestBroker);
}
} catch (Exception e) {
log.error("Error occurred when selecting message queue", e);
}
return tpInfo.selectOneMessageQueue();
}
return tpInfo.selectOneMessageQueue(lastBrokerName);
}
这段代码的核心就是进行队列的选取,选取的过程中伴随着负载均衡、故障检测,对于故障broker能够做到尽可能规避
发送的核心过程
1 | this.sendKernelImpl(msg, mq, communicationMode, sendCallback, topicPublishInfo, timeout - costTime) |
sendMessage()内部便是创建请求,按照发送方式调用不同的发送方法1
2
3
4
5
6
7
8
9
10
11
12
13
14
15
16
17
18
19
20
21
22
23switch (communicationMode) {
case ONEWAY:
this.remotingClient.invokeOneway(addr, request, timeoutMillis);
return null;
case ASYNC:
final AtomicInteger times = new AtomicInteger();
long costTimeAsync = System.currentTimeMillis() - beginStartTime;
if (timeoutMillis < costTimeAsync) {
throw new RemotingTooMuchRequestException("sendMessage call timeout");
}
this.sendMessageAsync(addr, brokerName, msg, timeoutMillis - costTimeAsync, request, sendCallback, topicPublishInfo, instance,
retryTimesWhenSendFailed, times, context, producer);
return null;
case SYNC:
long costTimeSync = System.currentTimeMillis() - beginStartTime;
if (timeoutMillis < costTimeSync) {
throw new RemotingTooMuchRequestException("sendMessage call timeout");
}
return this.sendMessageSync(addr, brokerName, msg, timeoutMillis - costTimeSync, request);
default:
assert false;
break;
}
- 单向:只管发送,不管是否发送成功;例如日志收集。 producer 只负责发送消息,不等待 broker 响应结果,而且也没有回调函数触发
- 同步:阻塞至拿到发送结果;指 producer 发送消息后,会在接收到 broker 响应后才继续发下一条消息的通信方式。
- 异步:发送后直接返回,在回调函数中等待发送结果
接下来就是调用封装的Netty进行网络传输了1
2
3
4
5
6
7
8
9
10
11
12
13
14
15
16
17
18
19
20
21
22
23
24
25
26
27
28
29
30
31
32
33
34
35
36
37
38
39
40
41
42
43
44
45
46
47
48
49
50
51
52
53
54
55
56
57
58
59RemotingCommand response = this.remotingClient.invokeSync(addr, request, timeoutMillis);
//NettyRomotingClient类中
//上句根据broker地址创建NIO的通信channel
//执行发送前置钩子方法
doBeforeRpcHooks(addr, request);
long costTime = System.currentTimeMillis() - beginStartTime;
if (timeoutMillis < costTime) {
throw new RemotingTimeoutException("invokeSync call timeout");
}
RemotingCommand response = this.invokeSyncImpl(channel, request, timeoutMillis - costTime);
doAfterRpcHooks(RemotingHelper.parseChannelRemoteAddr(channel), request, response);
//NettyRomotingAbstract类中 实现
public RemotingCommand invokeSyncImpl(final Channel channel, final RemotingCommand request,
final long timeoutMillis)
throws InterruptedException, RemotingSendRequestException, RemotingTimeoutException {
final int opaque = request.getOpaque();
try {
final ResponseFuture responseFuture = new ResponseFuture(channel, opaque, timeoutMillis, null, null);
//把自增请求ID responseFuture放入到responseTable(ConcurrentMap)中,后面唤醒的时候根据这个ID拿到responseFuture
this.responseTable.put(opaque, responseFuture);
final SocketAddress addr = channel.remoteAddress();
channel.writeAndFlush(request).addListener(new ChannelFutureListener() {
@Override
public void operationComplete(ChannelFuture f) throws Exception {
if (f.isSuccess()) {
//处理成功 等待唤醒
responseFuture.setSendRequestOK(true);
return;
} else {
responseFuture.setSendRequestOK(false);
}
//发送失败,直接唤醒 不进行阻塞了
responseTable.remove(opaque);
responseFuture.setCause(f.cause());
responseFuture.putResponse(null);
log.warn("send a request command to channel <" + addr + "> failed.");
}
});
//阻塞等待
RemotingCommand responseCommand = responseFuture.waitResponse(timeoutMillis);
if (null == responseCommand) {
if (responseFuture.isSendRequestOK()) {
throw new RemotingTimeoutException(RemotingHelper.parseSocketAddressAddr(addr), timeoutMillis,
responseFuture.getCause());
} else {
throw new RemotingSendRequestException(RemotingHelper.parseSocketAddressAddr(addr), responseFuture.getCause());
}
}
return responseCommand;
} finally {
this.responseTable.remove(opaque);
}
}
发送完毕之后,调用ResponseFuture的waitResponse方法使当前线程进行等待,使用 CountDownLatch.wait 方法实现,当 Netty 返回数据时,使用 CountDownLatch.countDown 进行唤醒,然后返回从 Broker 写入的结果,可能成功,也可能失败,需要到上层(Client层解析也就是NettyClientHandler处理),网络层只负责网络的事情。
到这儿,消息的发送就已经结束了,成功的从生产者传输到了Broker。
处理返回
客户端(Producer)通过NettyClientHandler会在 channelRead0 方法处理 Netty Server的返回值。见processMessageReceived 方法1
2
3
4
5
6
7
8
9
10
11
12
13
14
15public void processMessageReceived(ChannelHandlerContext ctx, RemotingCommand msg) throws Exception {
final RemotingCommand cmd = msg;
if (cmd != null) {
switch (cmd.getType()) {
case REQUEST_COMMAND:
processRequestCommand(ctx, cmd);
break;
case RESPONSE_COMMAND:
processResponseCommand(ctx, cmd);
break;
default:
break;
}
}
}
分为处理Request请求和Response响应。我们看看处理Response响应
public void processResponseCommand(ChannelHandlerContext ctx, RemotingCommand cmd) {
    final int opaque = cmd.getOpaque();
    final ResponseFuture responseFuture = responseTable.get(opaque);
    if (responseFuture != null) {
        responseFuture.setResponseCommand(cmd);

        responseTable.remove(opaque);

        if (responseFuture.getInvokeCallback() != null) {
            executeInvokeCallback(responseFuture);
        } else {
            responseFuture.putResponse(cmd);
            responseFuture.release();
        }
    } else {
        log.warn("receive response, but not matched any request, " + RemotingHelper.parseChannelRemoteAddr(ctx.channel()));
        log.warn(cmd.toString());
    }
}
通过cmd对象的RequestID找到ResponseFuture,执行 responseFuture.putResponse设置返回值,唤醒阻塞等待的发送线程。好,到这里,唤醒阻塞的发送线程,返回数据,客户端同步的发送消息就结束了
看源码的过程是艰辛的,只有不断积累坚持才会有收获。继续加油!!!